# DaisyDataToolkit User Guide
> A desktop tool for experimental data: preview HDF5 / HDF5 Master / TIFF files, convert between HDF5 and TIFF, export HDF5 to NPY or TXT, and crop data.
> Version 1.0 | Screenshots included
## 1. Where to find it
Log in to `torch.heps.ihep.ac.cn`, open the container, enter the Desktop and double-click `DaisyDataToolkit`. A Windows build is under internal testing.
Figure 1 — Launching DaisyDataToolkit from the TORCH container desktop
## 2. What the window looks like
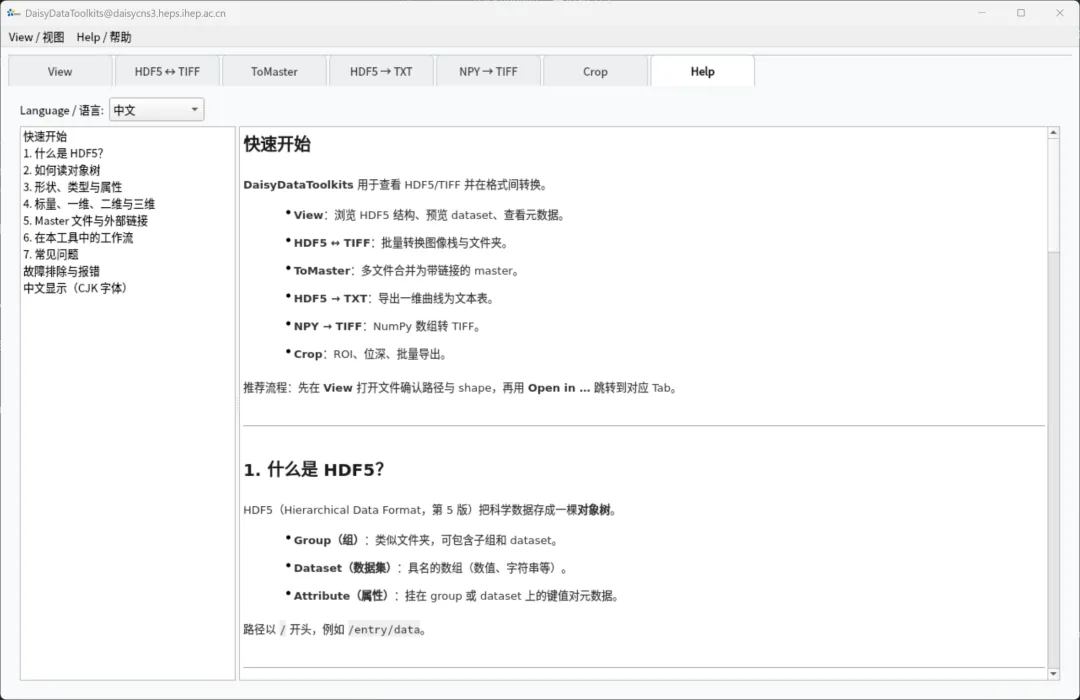
The top row holds the tabs. The commonly used ones:
| Tab | Purpose |
| --- | --- |
| View | Read-only: HDF5 tree and TIFF preview |
| HDF5 ↔ TIFF | Two-way image-stack conversion (most used) |
| ToMaster | Collect several HDF5 files into one Master via external links |
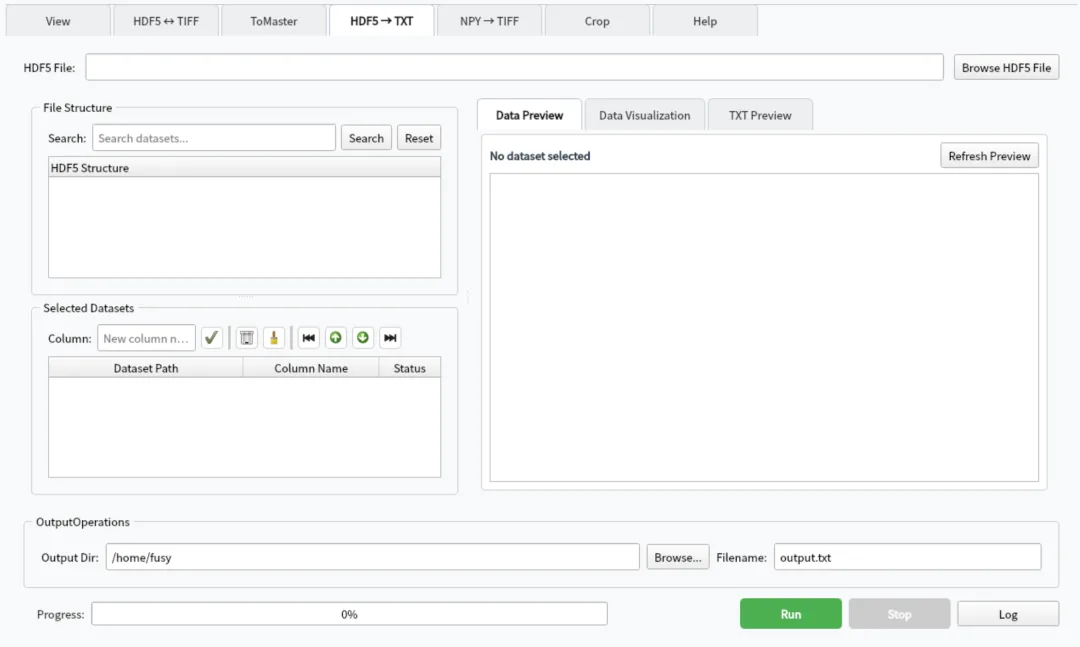
| HDF5 → TXT | Export scalars / 1-D curves as tables |
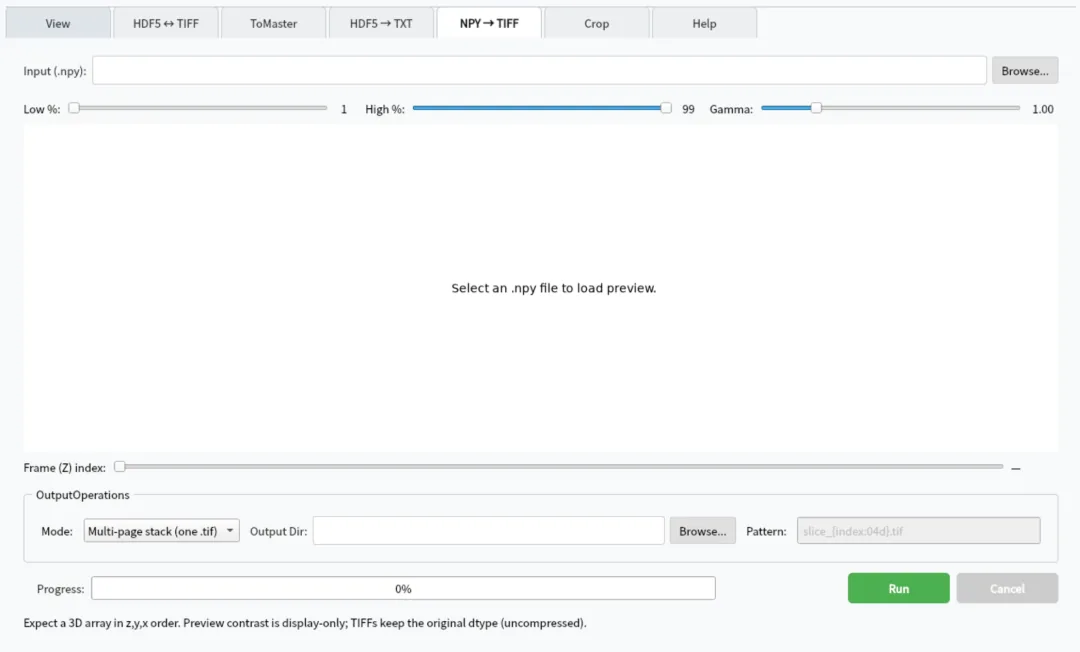
| NPY → TIFF | Write 3-D `.npy` data as TIFF |
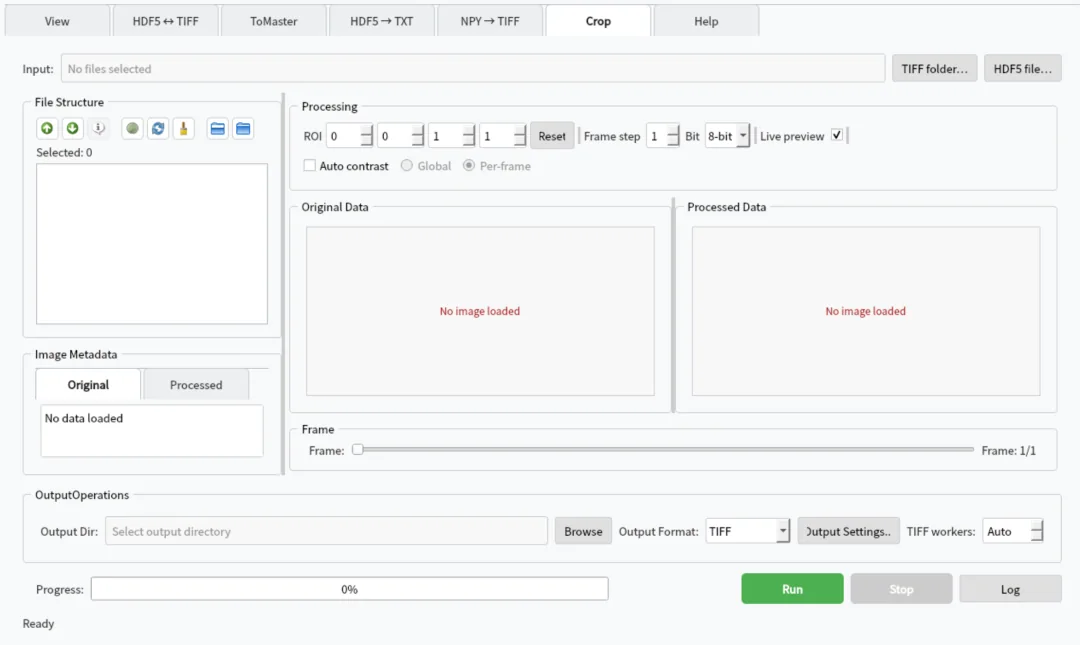
| Crop | Crop ROIs, change bit depth, batch export |
| Help | Tutorials (Chinese/English) and troubleshooting |
Figure 2 — Main window: tabs on top, progress bar and Run / Cancel / Log at the bottom
Most conversion pages have a progress bar, `Run` / `Cancel` and a `Log` at the bottom; `View` has no separate log. Click `Log` to expand failure reasons, and `Cancel / STOP` for long jobs. The menu also offers `View → Tabs` (show/hide tabs) and `Help → Activity Log`.
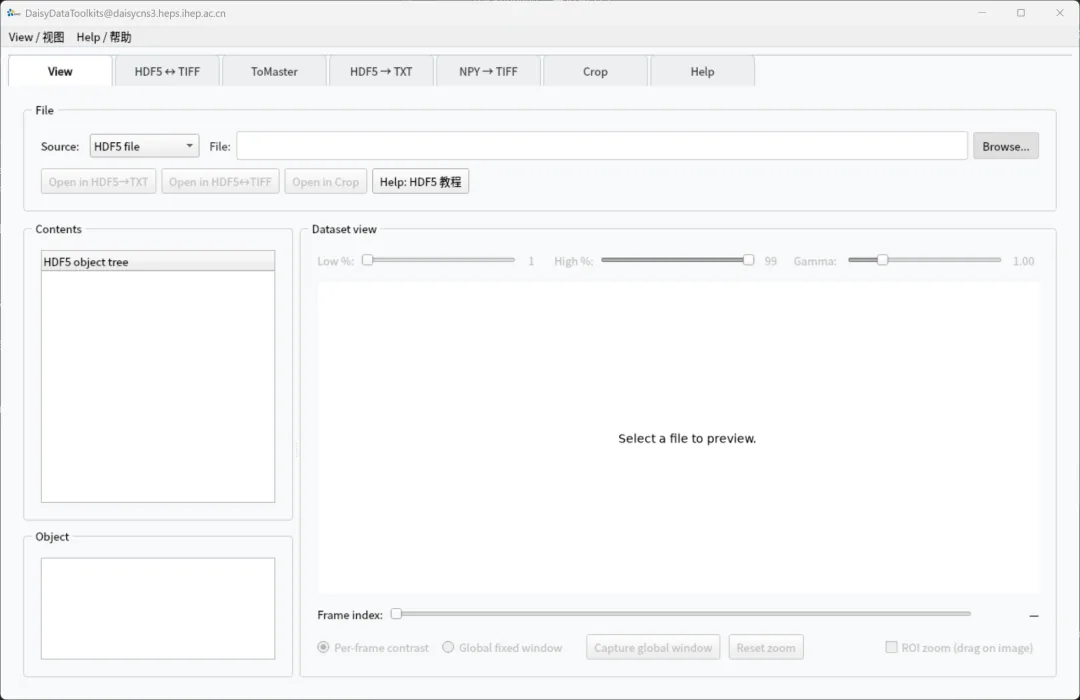
## 3. Start with View
- Pick `HDF5 file` or `TIFF images` as `Source` and open the file (several TIFFs can be added at once)
- Left `Contents` lists groups and datasets; middle `Object` shows path, shape, dtype and attributes
- Right `Dataset view` adjusts `Low % / High % / Gamma`; drag `Frame index` for multi-frame data
- For a closer look, enable `ROI zoom` and drag a rectangle
Previews may be downsampled — this only affects the display, not the resolution written by `Run`. Once you have found the right dataset, use `Open in HDF5 → TXT` or `Open in HDF5 ↔ TIFF` to carry the current file and path to the corresponding page.
Figure 3 — View page: data tree on the left, object attributes in the middle, preview on the right
## 4. HDF5 ↔ TIFF (core page)
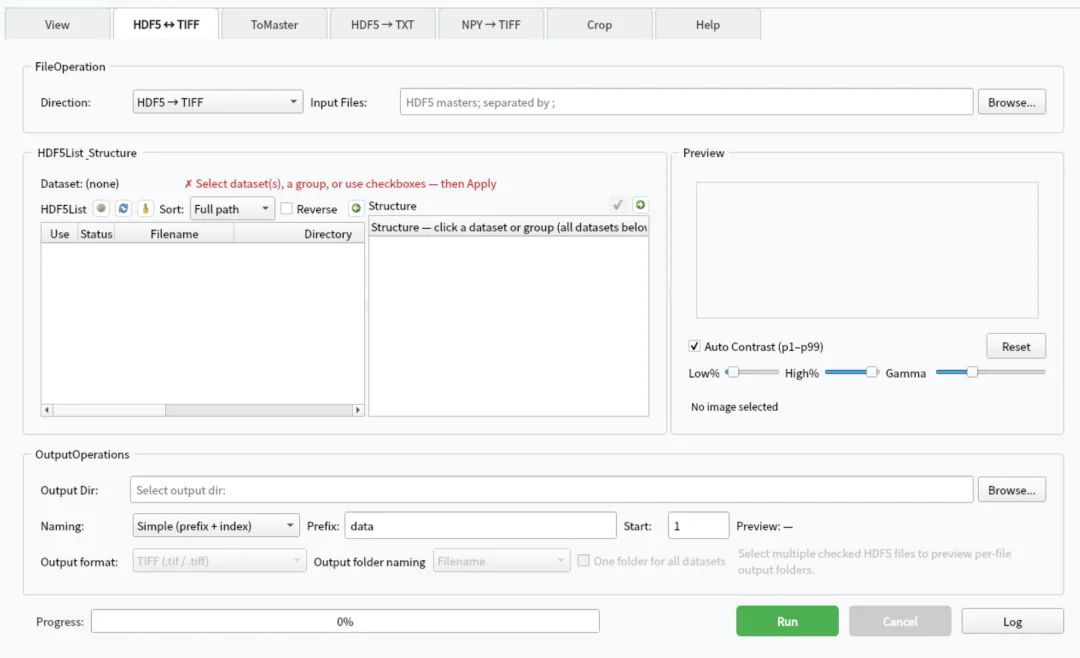
Recommended order: **choose direction → choose input → select Dataset in the tree → Apply → set output directory and naming → Run.** Skip `Apply` and `Run` will report that no dataset is selected — this is the most common stumbling block.
**HDF5 → TIFF**
1. Set the direction to `HDF5 → TIFF`
2. Use `Browse` to pick one or more `.h5` / `.hdf5` files (separate multiple paths with `;`); tick `Use` for the Masters to convert, and click a row to load it into `Structure`
3. In the tree: click a `Dataset` to select just it; click a `Group` to collect all datasets below it; checkboxes allow multi-selection
4. `Apply` is required — targets only take effect afterwards, together with a multi-Master check (paths must exist and dimensions must match)
5. Choose `Output Dir`. Default `Simple` naming is a prefix plus a sequence number (e.g. `data_00001.tif`); `Template` accepts `{ds:/path}` and `{index:05d}` and stops with an error if a path cannot be read
6. With multiple Masters you can split into sub-folders by file name or parent directory, or use `Shared folder` with continuous numbering
7. Click `Run`; the preview updates once the first frame is written
Written TIFF files are uncompressed and keep the original dtype and dimensions.
Figure 4 — HDF5 → TIFF page: direction, input files, dataset selection and Apply
**TIFF → HDF5**
1. Switch the direction to `TIFF → HDF5`
2. Select a folder (no need to click files one by one; check whether recursion into sub-folders is enabled)
3. Set `Output Dir`, `File Name` (`.h5`) and `Dataset Path` (e.g. `/entry/data`)
4. For a Master with external links, tick `Create Master File with External Links` and set `Batch Size`, prefix and `Link Group`
5. `Run`
## 5. ToMaster: collect many HDF5 files into one
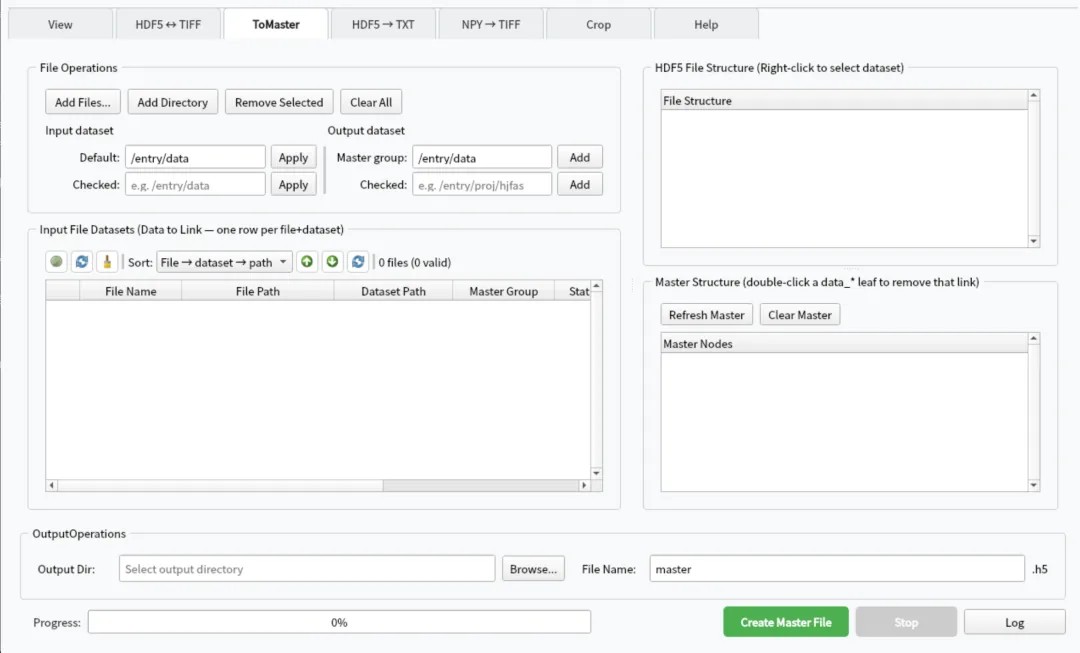
The specified dataset of every source file is attached to a Master through `External Link` (e.g. `/entry/data/data_000000` …), which is convenient for an overview or for later TIFF conversion.
1. Add sources with `Add Files` or `Add Directory`
2. Verify the dataset path of each row (default `/entry/data`); after changing the default click the matching `Apply`
3. `Master group` is the parent group holding the links (e.g. `/entry/data`); `Apply` rebuilds the temporary preview table
4. Tick the rows that take part in the Master; unticking clears the Master node name of that row
5. Check the temporary Master tree on the right
6. Set output directory and file name to generate the final Master
Figure 5 — ToMaster page: attaching datasets from several HDF5 files to one Master
## 6. HDF5 → TXT: exporting 1-D data
Only for scalars or 1-D datasets; 3-D images belong on the TIFF page.
1. `Browse` to open the HDF5 file, then find the dataset in the tree (`Search` helps)
2. Arrange the columns to export in the selection/sorting table
3. Set the output directory and file name (`.txt` is appended; tab-separated, opens in Excel)
4. `Run`; an existing file triggers an overwrite prompt
With a linked Master, values are read from the source files. The table preview may show only the first rows while the export still contains everything.
Figure 6 — HDF5 → TXT page: exporting scalar / 1-D datasets as tab-separated tables
## 7. NPY → TIFF
The `.npy` file must be 3-D with axis order `z, y, x`.
1. Choose the input `.npy` file; a preview appears in the middle
2. `Low / High / Gamma` only affect the display, not the written values
3. `Mode`: one multi-page stack, or one TIFF per z slice
4. Choose the output folder; for slices you can use a pattern such as `slice_{index:04d}.tif`
5. Click `Convert`
In stack mode the output uses the input name with `.tif`; an existing file triggers an overwrite prompt. If the axis order is not `z, y, x`, transpose it in NumPy before saving.
Figure 7 — NPY → TIFF page: 3-D arrays to multi-page TIFF or per-slice files
## 8. Crop: cut a region and batch export
- Add TIFF / HDF5 files
- Set the ROI, frame step, 8/16-bit output and automatic contrast
- Compare original and processed images side by side
- Pan and zoom both views in sync
Figure 8 — Crop page: ROI cropping, bit-depth conversion and batch export
## 9. Core vs. full installation
With a Core package, `View` and `Help` are always present while other tabs may show `Not installed`; clicking such a tab downloads the module on demand (a module repository must be configured). A full package ships every tab from the start. `View → Tabs` hides tabs you do not need.
## 10. FAQ
**Run says no dataset is selected.** On HDF5 → TIFF you must select datasets in `Structure` and click `Apply`; check that the status bar shows "applied".
**Multi-Master validation failed.** Every ticked Master must contain the same dataset path with identical dimensions; failing rows are highlighted in the list.
**Template naming fails.** Check that the `{ds:/...}` path exists and points to a dataset, and that a 1-D length matches the frame count — otherwise the run stops instead of converting blindly.
**Unticking a row in ToMaster.** That row no longer joins the Master and its node path is cleared.
**No desktop on Linux.** This is a GUI application and needs a display; without one, use the script package of DaisyDataToolkit.
**Preview looks softer than the result.** The preview may be downsampled; `Run` still writes the original resolution.