DaisyDataToolkit User Guide
A desktop tool for experimental data: preview HDF5 / HDF5 Master / TIFF files, convert between HDF5 and TIFF, export HDF5 to NPY or TXT, and crop data. Version 1.0 | Screenshots included
1. Where to find it
Log in to torch.heps.ihep.ac.cn, open the container, enter the Desktop and double-click DaisyDataToolkit. A Windows build is under internal testing.

2. What the window looks like
The top row holds the tabs. The commonly used ones:
| Tab | Purpose |
|---|---|
| View | Read-only: HDF5 tree and TIFF preview |
| HDF5 ↔ TIFF | Two-way image-stack conversion (most used) |
| ToMaster | Collect several HDF5 files into one Master via external links |
| HDF5 → TXT | Export scalars / 1-D curves as tables |
| NPY → TIFF | Write 3-D .npy data as TIFF |
| Crop | Crop ROIs, change bit depth, batch export |
| Help | Tutorials (Chinese/English) and troubleshooting |
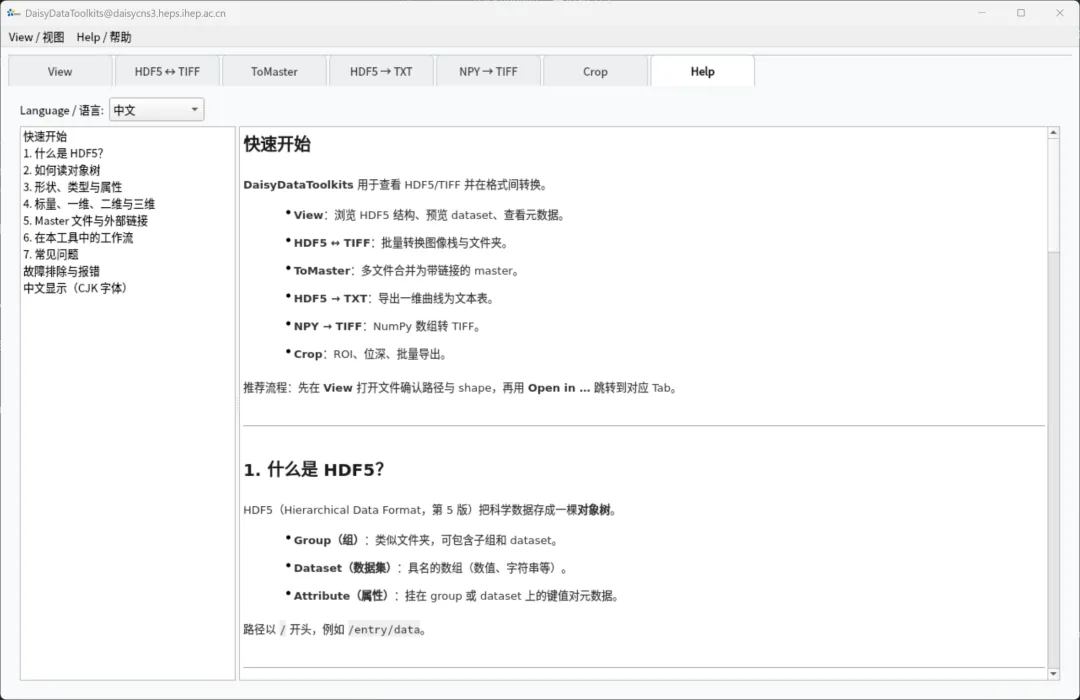
Most conversion pages have a progress bar, Run / Cancel and a Log at the bottom; View has no separate log. Click Log to expand failure reasons, and Cancel / STOP for long jobs. The menu also offers View → Tabs (show/hide tabs) and Help → Activity Log.
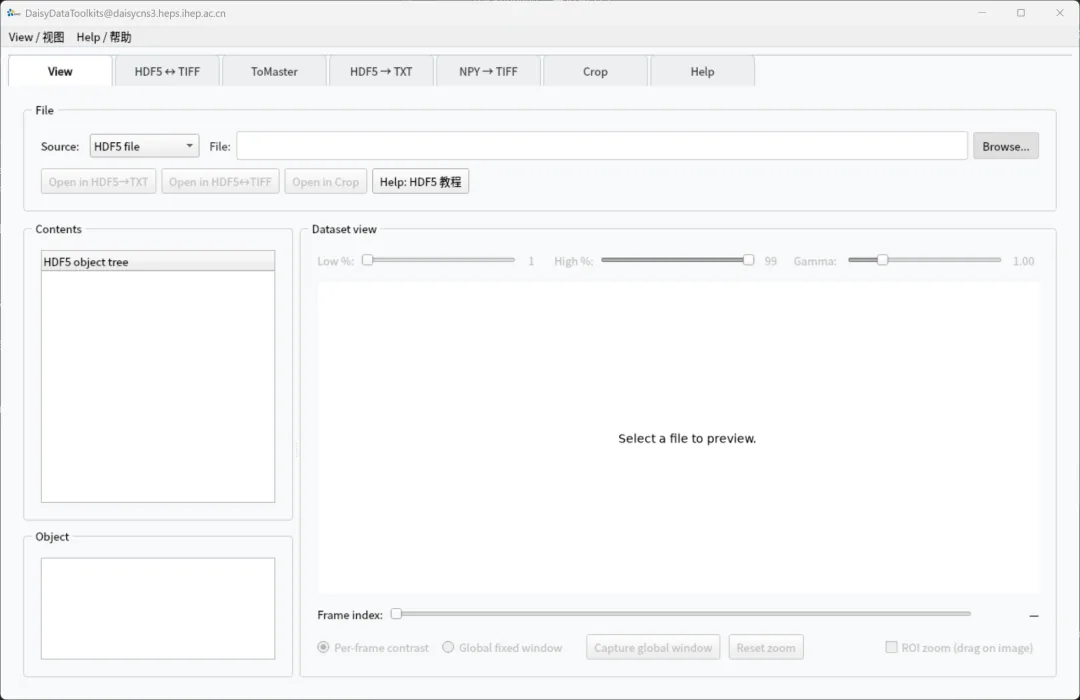
3. Start with View
- Pick
HDF5 fileorTIFF imagesasSourceand open the file (several TIFFs can be added at once) - Left
Contentslists groups and datasets; middleObjectshows path, shape, dtype and attributes - Right
Dataset viewadjustsLow % / High % / Gamma; dragFrame indexfor multi-frame data - For a closer look, enable
ROI zoomand drag a rectangle
Previews may be downsampled — this only affects the display, not the resolution written by Run. Once you have found the right dataset, use Open in HDF5 → TXT or Open in HDF5 ↔ TIFF to carry the current file and path to the corresponding page.
4. HDF5 ↔ TIFF (core page)
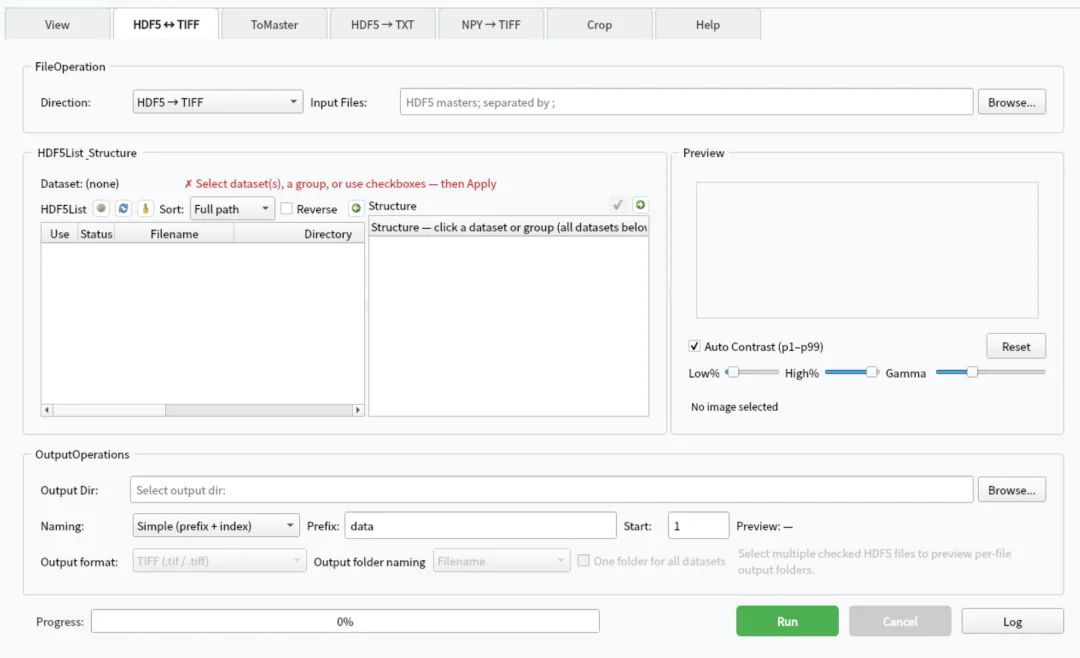
Recommended order: choose direction → choose input → select Dataset in the tree → Apply → set output directory and naming → Run. Skip Apply and Run will report that no dataset is selected — this is the most common stumbling block.
HDF5 → TIFF
- Set the direction to
HDF5 → TIFF - Use
Browseto pick one or more.h5/.hdf5files (separate multiple paths with;); tickUsefor the Masters to convert, and click a row to load it intoStructure - In the tree: click a
Datasetto select just it; click aGroupto collect all datasets below it; checkboxes allow multi-selection Applyis required — targets only take effect afterwards, together with a multi-Master check (paths must exist and dimensions must match)- Choose
Output Dir. DefaultSimplenaming is a prefix plus a sequence number (e.g.data_00001.tif);Templateaccepts{ds:/path}and{index:05d}and stops with an error if a path cannot be read - With multiple Masters you can split into sub-folders by file name or parent directory, or use
Shared folderwith continuous numbering - Click
Run; the preview updates once the first frame is written
Written TIFF files are uncompressed and keep the original dtype and dimensions.
TIFF → HDF5
- Switch the direction to
TIFF → HDF5 - Select a folder (no need to click files one by one; check whether recursion into sub-folders is enabled)
- Set
Output Dir,File Name(.h5) andDataset Path(e.g./entry/data) - For a Master with external links, tick
Create Master File with External Linksand setBatch Size, prefix andLink Group Run
5. ToMaster: collect many HDF5 files into one
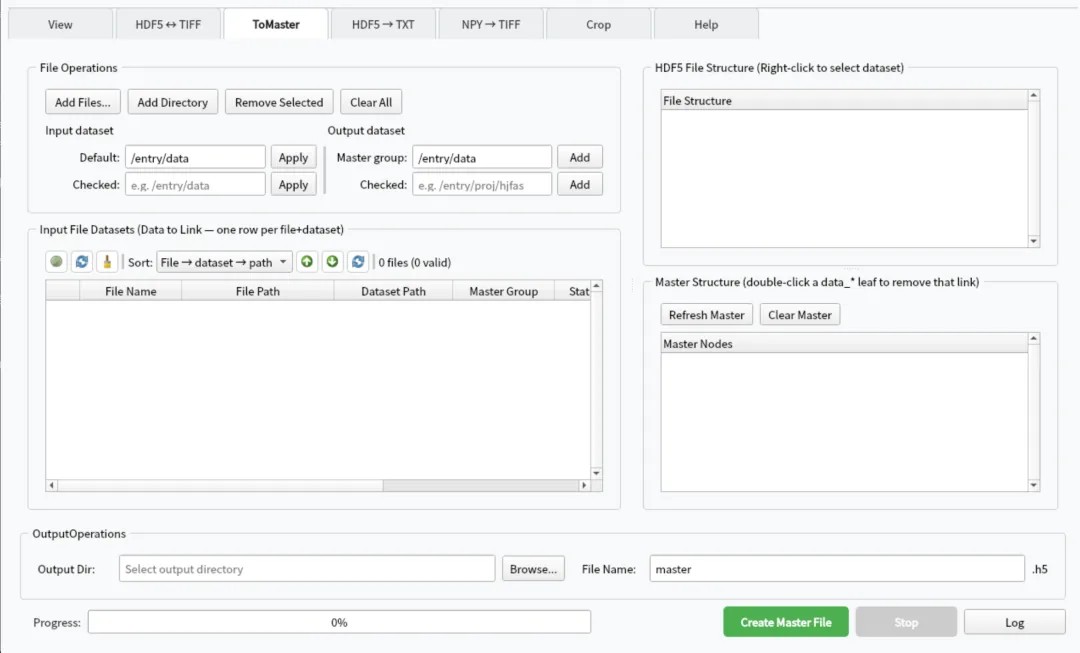
The specified dataset of every source file is attached to a Master through External Link (e.g. /entry/data/data_000000 …), which is convenient for an overview or for later TIFF conversion.
- Add sources with
Add FilesorAdd Directory - Verify the dataset path of each row (default
/entry/data); after changing the default click the matchingApply Master groupis the parent group holding the links (e.g./entry/data);Applyrebuilds the temporary preview table- Tick the rows that take part in the Master; unticking clears the Master node name of that row
- Check the temporary Master tree on the right
- Set output directory and file name to generate the final Master
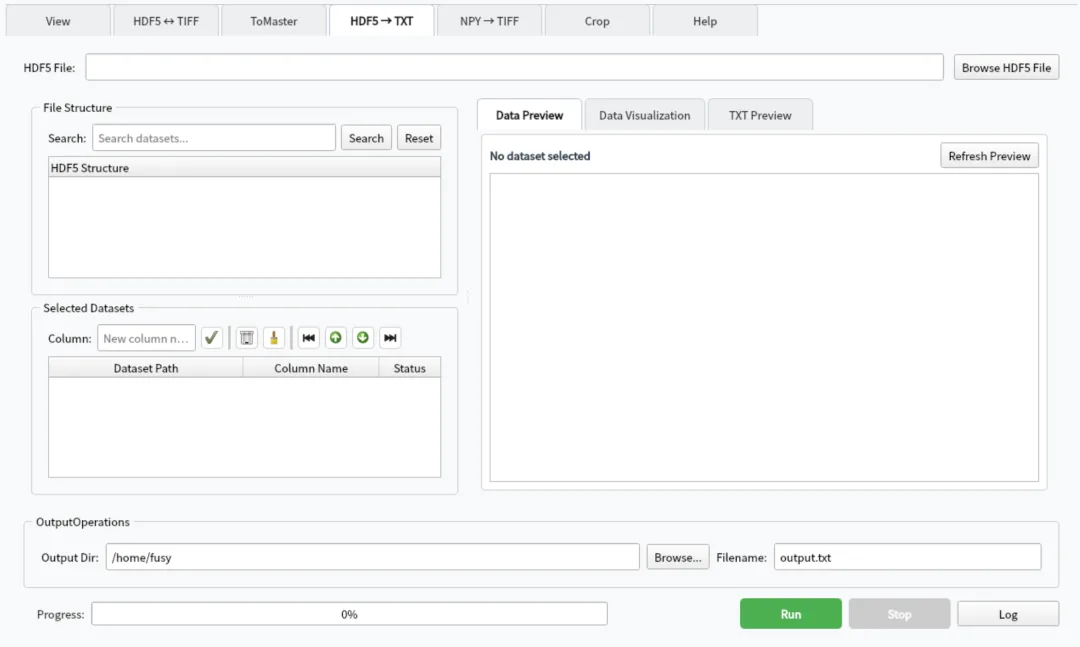
6. HDF5 → TXT: exporting 1-D data
Only for scalars or 1-D datasets; 3-D images belong on the TIFF page.
Browseto open the HDF5 file, then find the dataset in the tree (Searchhelps)- Arrange the columns to export in the selection/sorting table
- Set the output directory and file name (
.txtis appended; tab-separated, opens in Excel) Run; an existing file triggers an overwrite prompt
With a linked Master, values are read from the source files. The table preview may show only the first rows while the export still contains everything.
7. NPY → TIFF
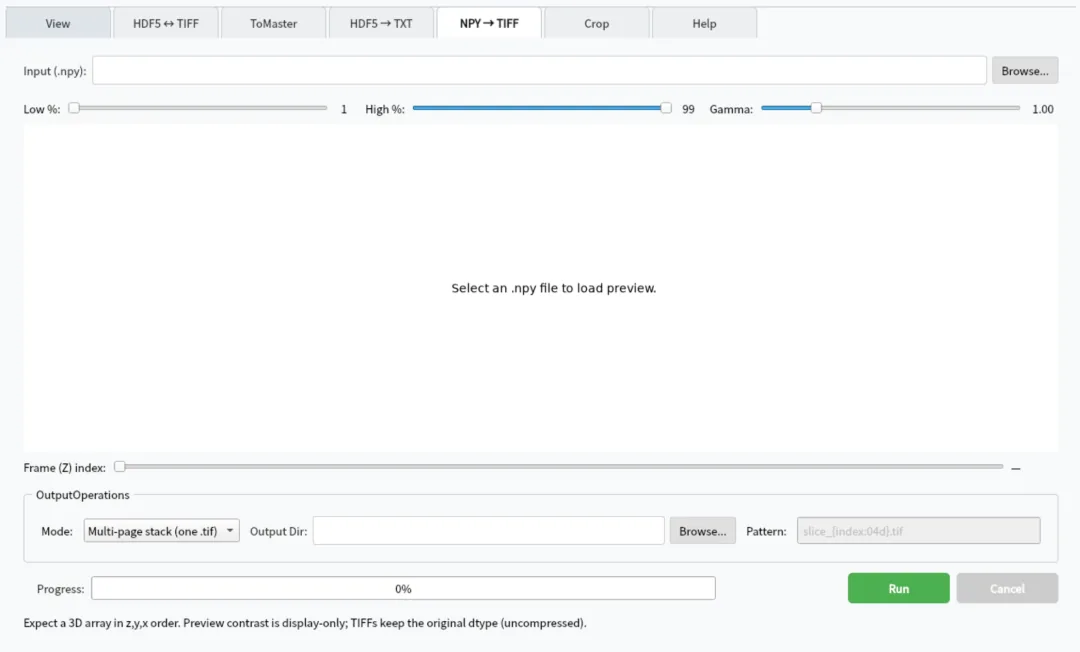
The .npy file must be 3-D with axis order z, y, x.
- Choose the input
.npyfile; a preview appears in the middle Low / High / Gammaonly affect the display, not the written valuesMode: one multi-page stack, or one TIFF per z slice- Choose the output folder; for slices you can use a pattern such as
slice_{index:04d}.tif - Click
Convert
In stack mode the output uses the input name with .tif; an existing file triggers an overwrite prompt. If the axis order is not z, y, x, transpose it in NumPy before saving.
8. Crop: cut a region and batch export
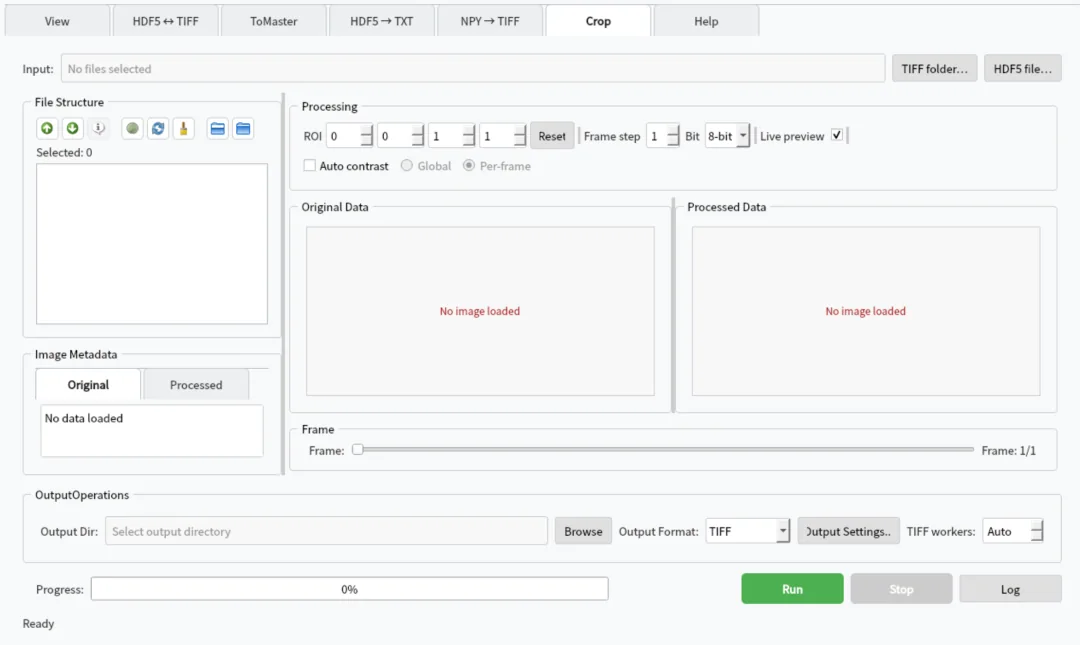
- Add TIFF / HDF5 files
- Set the ROI, frame step, 8/16-bit output and automatic contrast
- Compare original and processed images side by side
- Pan and zoom both views in sync
9. Core vs. full installation
With a Core package, View and Help are always present while other tabs may show Not installed; clicking such a tab downloads the module on demand (a module repository must be configured). A full package ships every tab from the start. View → Tabs hides tabs you do not need.
10. FAQ
Run says no dataset is selected. On HDF5 → TIFF you must select datasets in Structure and click Apply; check that the status bar shows "applied".
Multi-Master validation failed. Every ticked Master must contain the same dataset path with identical dimensions; failing rows are highlighted in the list.
Template naming fails. Check that the {ds:/...} path exists and points to a dataset, and that a 1-D length matches the frame count — otherwise the run stops instead of converting blindly.
Unticking a row in ToMaster. That row no longer joins the Master and its node path is cleared.
No desktop on Linux. This is a GUI application and needs a display; without one, use the script package of DaisyDataToolkit.
Preview looks softer than the result. The preview may be downsampled; Run still writes the original resolution.